


Thursday, December 29
Tuesday, December 27
My version of Taking Turns top


Got this done in a few hours, long story short, cos I'm posting from my phone and a very slow computer from my hometown, I'm happy with the results, wore this on Christmas and I also made another garnment which I still have to take pictures of cos I still have to make a frog closure for it, sigh. Oh and I also finished my mom's gift, which was an embroidered fabric covered frame, I'll post pics soonish, I don't think I'll have internet in my new place next week, double sigh.
Sunday, December 25

Sunday, December 18
Sunday, December 11

Sunday, December 4

Embroidery Books... and moving ugh
It's been a crazy month, with exams and what it looked like an eternal search for a new apartment. Luckily I've found it so now to the next crazy step which is, pack and move, I don't even know where to start, I only know it'll be a mess for a few days.
In other news, I'm excited because I've received a book (ok not an embroidery one) I ordered on Etsy back in October, The Flight of the Dragons by Peter Dickinson, I have a thing for dragons so when I found this vintage book for $10, I didn't think much, although I had to pay more than twice the price in shipping but I think it was worth it.
Another book that recently arrived after a super loooong wait (I've ordered it on sept 29th and it was supposed to arrive on Nov 10th, it finally did on December 1st. Amazon refund me the shipping money so I gotta say 5 stars for their customer service!) is Needle Painting Embroidery: Fresh ideas for beginners by Trish Burr I found out about the book in a review at Needle n' Thread's blog, that blue and brown bird was love at first sight, so I knew I had to get the book, that project is for advanced embroiderers but a girl can dream. I'm not really into flowers in general but I know my mom would love each project in this book, so I'm sort of buying this book to make things only for her.
 I don't think I'm ready to make a book review because I've not tried any project in the book yet, but I think this is definitely a good book for beginners, she explains everything in detail and with pics.
A nice detail I saw is... Trish uses metric system and imperial between brackets, I love that! it's a tiny detail but it's a detail that matters to me, I've seen other embroidery books at Amazon and it's all about inches and 1/4, and 1/8 inch and cm and mm are nowhere, as an English student I'm supposed to know or study the imperial system as well but I think authors should use both like Trish.
A few days ago, I found out Trish Burr released a new book, Colour Confindence in Embroidery*. It looks very very interesting, but I think it will have to wait till next year because I've gone crazy with Spoonflower's sales last month :p, I think I've bought enough for what I'd not bought in the previous months.
Another book review I found out about is the one for Embroider Everything Workshop at Wild Olive, it looked very interesting as well, so I went to Amazon to check if they had the Look inside feature, they did so I had a look, what I like about the book is that it has history facts and curious tips, also there is a wide explanation about the materials, like needles, threads, fabrics and it comes with iron on transfers, on the other side, the author uses imperial system (but I'm just being picky there) and also, the projects I was able to see are not thaaat stunning, but I'm more into realistic embroidery, so I guess it's fine and I might take that back when the book is in my hands, so it goes to my wish list for next year!
*Colour with U, color, elevator, among others, yeah, I'm weird, I write in American English and yet I don't use the Imperial system.

In other news, I'm excited because I've received a book (ok not an embroidery one) I ordered on Etsy back in October, The Flight of the Dragons by Peter Dickinson, I have a thing for dragons so when I found this vintage book for $10, I didn't think much, although I had to pay more than twice the price in shipping but I think it was worth it.
Another book that recently arrived after a super loooong wait (I've ordered it on sept 29th and it was supposed to arrive on Nov 10th, it finally did on December 1st. Amazon refund me the shipping money so I gotta say 5 stars for their customer service!) is Needle Painting Embroidery: Fresh ideas for beginners by Trish Burr I found out about the book in a review at Needle n' Thread's blog, that blue and brown bird was love at first sight, so I knew I had to get the book, that project is for advanced embroiderers but a girl can dream. I'm not really into flowers in general but I know my mom would love each project in this book, so I'm sort of buying this book to make things only for her.
A nice detail I saw is... Trish uses metric system and imperial between brackets, I love that! it's a tiny detail but it's a detail that matters to me, I've seen other embroidery books at Amazon and it's all about inches and 1/4, and 1/8 inch and cm and mm are nowhere, as an English student I'm supposed to know or study the imperial system as well but I think authors should use both like Trish.
A few days ago, I found out Trish Burr released a new book, Colour Confindence in Embroidery*. It looks very very interesting, but I think it will have to wait till next year because I've gone crazy with Spoonflower's sales last month :p, I think I've bought enough for what I'd not bought in the previous months.
Another book review I found out about is the one for Embroider Everything Workshop at Wild Olive, it looked very interesting as well, so I went to Amazon to check if they had the Look inside feature, they did so I had a look, what I like about the book is that it has history facts and curious tips, also there is a wide explanation about the materials, like needles, threads, fabrics and it comes with iron on transfers, on the other side, the author uses imperial system (but I'm just being picky there) and also, the projects I was able to see are not thaaat stunning, but I'm more into realistic embroidery, so I guess it's fine and I might take that back when the book is in my hands, so it goes to my wish list for next year!
*Colour with U, color, elevator, among others, yeah, I'm weird, I write in American English and yet I don't use the Imperial system.
Saturday, December 3
Brownies and Pastafrola
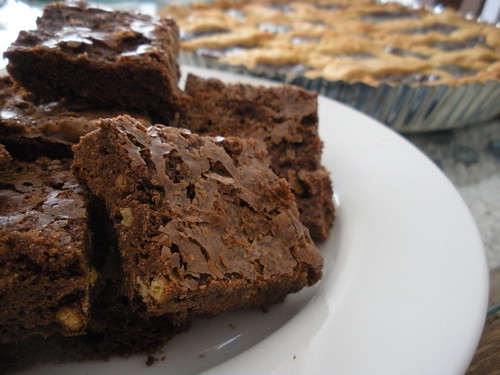
I baked these two back in May and they were a success.
This time I changed the recipe a bit.
Brownies: I changed nuts for inflated quinoa and also they are thinner, which made them be not as humid as brownies should be, but I got compliments anyways so it worked.
Pastafrola: this is the third time I bake this, never took pics of the last two because I suck at making the weaving, the dough is so sticky that at the end I give up and just roll the dough in my hands. This time I was smart enough to spread the dough between two freezer separator sheets and it worked. About the stuffing, it's always dulce de leche, the traditional recipe is with other jams like membrillo, last time I baked pastafrola, I got a little extra dough and baked a tiny one with membrillo jelly and it turned great when cut.
Sunday, November 27

Sunday, November 20

Sunday, November 13

Sunday, November 6

Sunday, October 30

Sunday, October 23

Friday, October 21
Failure
Just started to watch a video playlist about failure at Etsy, and this video is so me hah, after watching this I really gotta say procrastination leads to creativity, which is great! but in my case it also leads to start other projects and frog them again for other projects and so my list of half things done starts to get big.
There is really no hurry to finish anything for me since I just create as a hobby, it's not a job, it could be but I guess, as the video curator says at the first video, failure is just being afraid to fail. And I'm afraid to fail or maybe to succeed too?
Key words or thoughts that got stuck in my head after watching this playlist:
- If you fail, It's not a big deal, don't take it personal
- If you get a door slammed in your face, don't try the same thing, improve, change, experiment.
- Perseverance is also a key
- Those people at the Fail Harder project must have gotten sore wrists after all that pinning!
〰☺〰
There is always something random to learn, right? (besides the whole point of learning from failures)
I'm a linguistic sucker and as I was watching this playlist, I learned the expression "bull in a china shop" and it turns out bulls have been misjudged after all! I wonder if this is the case of "as mad as a March hare"
Sunday, October 16
Wednesday, October 12
My experience with Spoonflower

Back in August I found out Spoonflower was having a Free Swatch Day, and I thought, why not? The site was kind of laggy during that day so I didn't think much when I chose my swatch, I saw this cute Charcoal Guitar Damask design, so I "bought" it and hoped for the best.
A month went by and nothing, this usually happens since I live at the bottom of the world and it seems my postal service is slow.
A very very good thing I have to highlight about Spoonflower is their costumer service, they instantly re ordered my swatch and sent it by FedEx with tracking service so I could know where the package was and a few days later I got it at home!
When I opened it I was delighted with what I saw, all the paperwork with a signature (it's "nothing" but it adds that personal touch) and the pretty swatch.
I can say now that I'm happy with Spoonflower, I don't think I would buy large amounts of fabric because of the price and shipping rates, I guess I would if I lived in the US. But my point is, what they offer is awesome, one of a kind fabric designs, you can print your own, and a variety of fabrics up to your needs.
Back to the swatch I got, there is this question going on in my head... "what am I going to do with it?"
I've not found many swatch projects yet, I think a quilt block would be accurate or something like this fabric frame.
I thought about making a cardboard box to store guitar picks and a guitar tuner, sadly I don't play guitar anymore, but it'd be a good idea to store all those picks I don't use anymore...
Edit 13/10: Found some more ideas!
·Ideas to using fabric samples
·A very long thread full with ideas in Flickr about what you can make out of a swatch
·And last but not least, I don't know why I've not thought about looking there before!, I went to Spoonflower then Connect and then Community and found a blog entry with the same question: What to do with Spoonflower fabric swatches?. I really like the origami box idea, I also like the pyramid pouch but I think I'd have to use a smaller design on my fabric, otherwise it'd not make much sense.
Monday, October 10
My trial & error at dyeing with kitchen products

To be honest I wasn't really sure I was going to find the right color in fabric, thanks to Mother Nature, last Saturday morning when I was about to head to the fabric store, it suddenly started to rain heavily and hail so I had to stay home and use my brain to figure out how was I going to get the project done, or more like start it without leaving my cozy and safe home.
This is the book and some white cotton fabric I had on stash. The skin tones didn't look so hard to achieve, I don't want them to be the exact same tone because it's impossible but a inspired one would be ok.


Trial 1
Pink Cup is full with a black tea bag and a tea spoon of coffee,
Green Cup is full with a tea bag,
Blue Cup is half full with a tea bag.
Time: 3 hours
Results: All of them got the same tone, which is a nice one but I wanted it darker.
Trial 2
Again boiled water and rinsed each swatch before placing them in each cup.
Pink Cup is half full with 2 or 3 spoons of coffee, it's a granulated one.
Green Cup is empty, I liked the tone of trial 1.
Blue Cup is full with 2 tea bags
Time: all night
Results: very happy with the blue cup one, the pink one was promising but after I rinsed it, the color faded away and it went back to the original "green cup tone"

Close to the skin tones, but one of the lighter swatches needs to be darker.
Trial 3 -trying something different, spices!-
Boiled water, filled a cup and a bowl, rinsed the lighter swatches (pink and green cup's) in:

Bowl: Added some paprika (pictured) and rubbed a little bit of tandori masala on the fabric.
Green Cup: Added spice for rice
Time: for the green cup, about an hour or 2 and all night and a little more for the bowl.
Results: Stunning, I'm shocked at how the spice of rice dyes!, the result was a bright yellow, which is not handy for this project but it was nice to discover. However I'm happy with the Tandori Masala one, I thought it was going to wash off but it stained just as I wanted, very subtle, it comes handy for one of the character's skin.


And the final results! I'm happy with these skin tones I've achieved, I can't wait to embroider on them!

I've read that if you are dying garments or items like bags, you should add white vinegar or salt to the dye preparation so the color doesn't fade away, I don't think that'll be necessary for me since I'm making patches and embroider on them but it's a good tip.
More Colors!
· Making Natural Dyes from Plants: a very eye catching list of natural materials to dye with.
Español
En realidad no busque sitios, pero sin querer encontre este articulo sobre como obtener un color rosa con elementos naturales.
Sunday, October 9

Saturday, October 8
A sweet book to "cover" in stitches
I got myself into a new "stitch along" project again (like if I don't have enough "half wips" already!), this time, a very very interesting and challenging one, The Covered in Stitches Contest. I'll try to get to the deadline, but it'll be hard with all the term tests coming but, again, I don't mind not winning, since I never do and I'm relatively still a noob at embroidery, I like challenges though, best part of it is learning and discovering new things. I've not even started and discovered a bunch already.
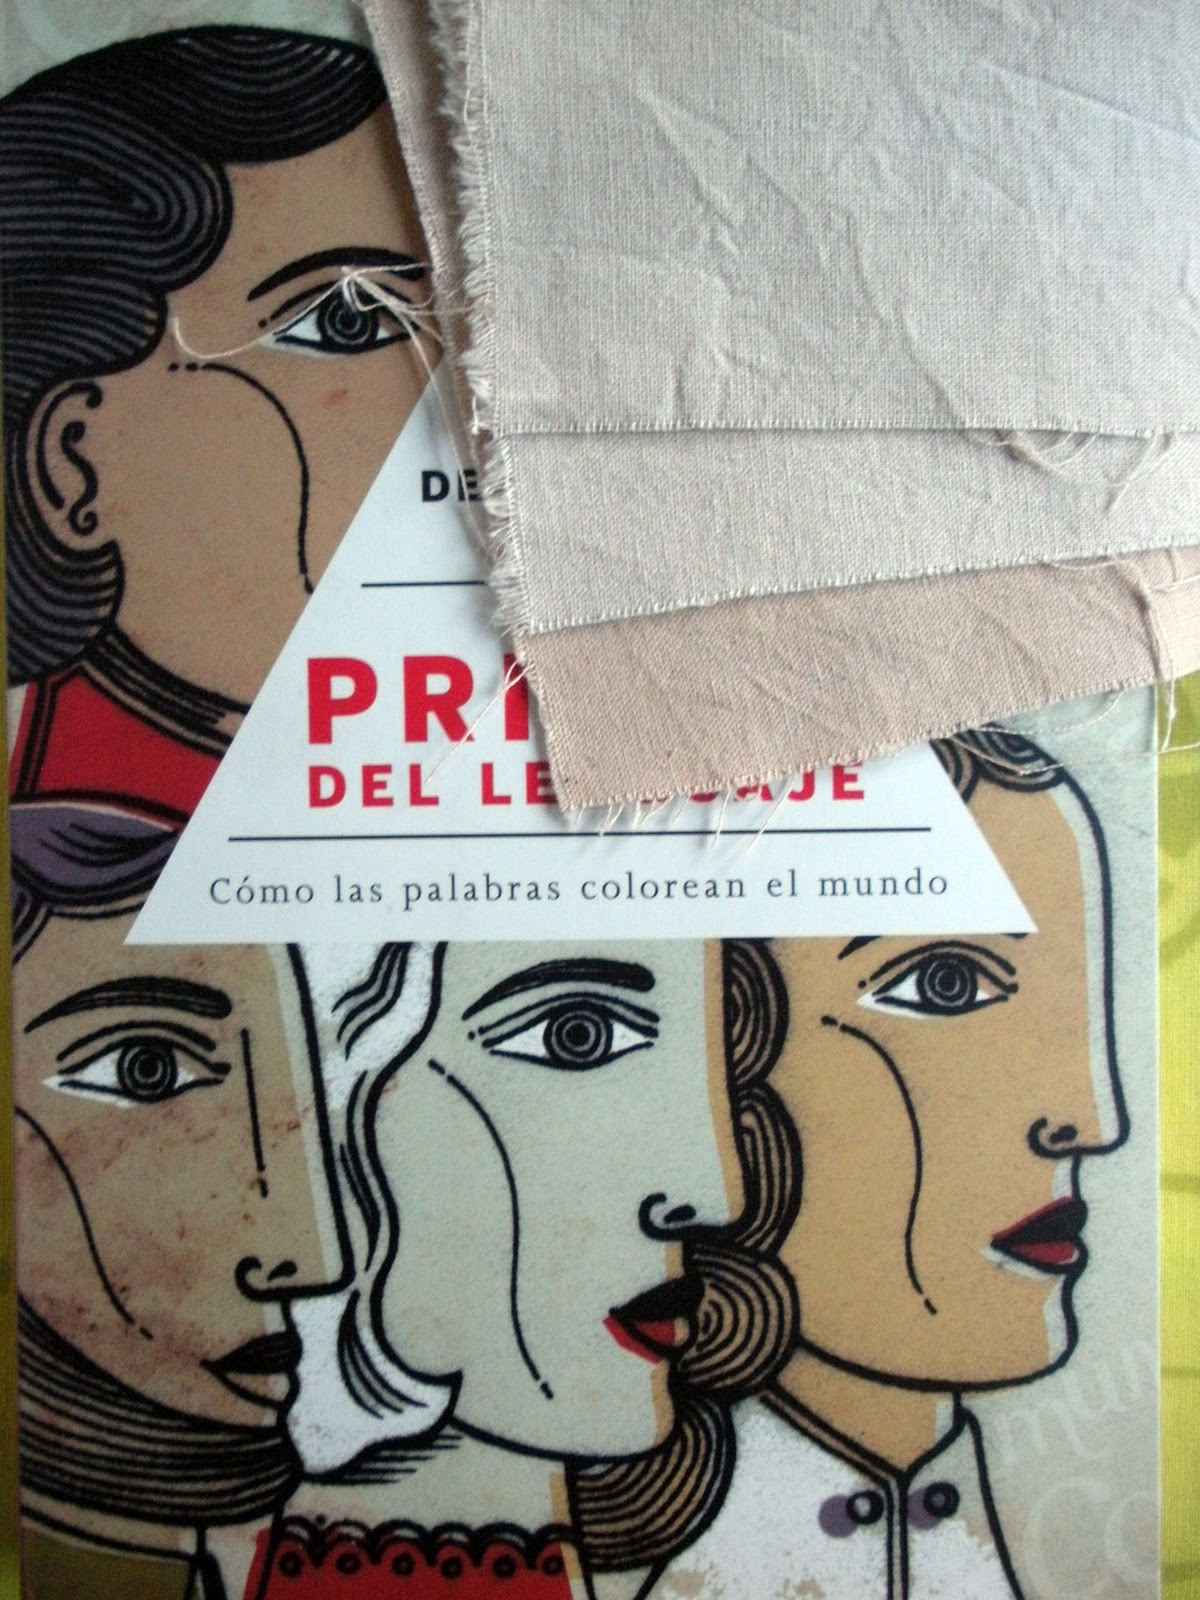
Like the book I "chose" or more like, it "chose" me. It's called "El prisma del Lenguaje", Through the Language glass by Guy Deustcher, it's a very interesting book, I'm a language junkie, so I instantly felt like this is my book. I'm very excited about it, it's very well written and it catches my attention (and I have short attention span!) and sometimes the author pulls out a linguistic joke so it's very entertained to read.
I always look for pictures in books, (like a kid!), this book doesn't have many but it has some graphics about colors which was also a plus, I'm not too deep in the book yet but it seems the essence of the book is how people from other countries define or have different terms for colors, which is very very interesting, I can't wait to get there.
I'm buying the English version soon and nah, I'm not crazy to buy the "same" book twice, as a wannabe translator I'm aware of the fact that, specially in literature or language books, the original meaning and the creativity behind the words can become lost in translation so I'm really looking forward to do so, buy the original.
Oh... so back to the point (see, I have short attention span) I chose this book for the Feeling Stitchy contest I was talking about up there and at the moment I'm starting with the "foundations", I'm testing some colors and they are drying, so since I don't have pics, here is a kitty.

Tuesday, October 4
Cutting mat care tips from a beginner // Cuidados para plancha de corte de un principiante
"Am I using this right?"... is the question that has been in my mind since I bought my self healing cutting mat.
Sometimes when I cut fabric, the cuts close with all the lint or fibers in it.
I was worried about that so I had to google it up, turns out is kind of common and I found out many facts I didn't even know about, like, the mats love moisture or that they can be store under the mattress so they don't bend.
Here are some links:
· Care tips and other questions about cutting mats, Olfa cutting mats but I think it applies to almost every brand.
· An user review, very detailed and informative, I specially like when she says: "I make sure to run my hand over the cutting mat to brush any stray pieces of lint and fabric from the surface." That is my first instinct after I cut but I still see some fibers caught in there and that is starting to annoy me,
//Spanish break to translate, I've not seen much information about care and cleaning of cutting mats in my mother tongue so here comes my bit. Find the (ah so cute) to keep reading where I left.//
¿Estoy usando esto bien?... me pregunto desde que compre mi plancha de corte (o llamada plancha de patchwork, base de corte o el nombre menos común, mesa de corte). Cada vez, o la mayoria de las veces cuando corto tela con el cortante circular en la plancha, quedan restos de tela en los cortes cuando se cierran, me preocupo eso asi que busque en internet.
No sale mucho en español pero si en inglés, asi que este es mi granito de arena para otros inexpertos como yo que recien se inician en usar esta "nueva tecnologia".
De este sitio donde hablan de los cuidados de las planchas Olfa pero que, yo creo, se pueden aplicar a todas las otras marcas, puedo resumir esto en cuanto a los cuidados:
No se si es porque no tengo experiencia o no se, o nadie habla de como sacarlos porque es demasiado común pero esto es lo que intente para sacar esos pedacitos de tela.✰
I'm not sure if I'm so inexperienced with the tools or nobody talks about that problem in depth because is way too common but here is my experience getting rid of those fibers.
So on the weekend after I cut the pieces for the purple shrug, I saw a lot of jersey lint in the cuts, so I decided to test what I read.
I grabbed a glass of water and wet the surface, not a lot, just where the cuts where, then I massaged it a little bit and left it to absorb just a few minutes, then I grabbed an old teeth brush and started to brush the fibers, some came out but still there were a lot of it.
Then I dried the surface with a towel, and after a few minutes of staring at the mat and thinking: "I will never be able to make a patchwork blanket", something came to mind, I had read an article about cleaning a paper cutting mat and it said something about using tape, it was genius!, so I tried... and it totally worked!
✰Agarre un vaso de agua y moje la superficie donde estaban los cortes, masajee un poco y deje que absorba un par de minutos, después cepille los cortes con un cepillo de dientes viejo y salieron un poco de hilos, pero igual seguia quedando bastante. Seque la plancha con una toalla y despues de pensar un rato, me acorde que habia leido algo sobre usar cinta adhesiva para limpiar pedacitos de papel de una plancha de corte para papel tipo guillotina. Probe y funciono bastante bien!
 It is just like waxing lol, just cut a strip of tape, tape it, scratch where the lint is and lift it off quickly!
Tal cual depilación tradicional :p, hay que cortar un pedacito de cinta, pegarlo, raspar para que los hilos se peguen bien y dar el tiron!
 I use the same strip to keep lifting off until the lint doesn't get stuck anymore and that is it, cutting mat like new! Such a relief, thought I was really bad at cutting in this.
Salen bastante bien, use varias veces la cinta hasta que no se pegaron mas hilachas y asi repeti hasta que quedo como nueva... un alivio, ya me sentia frustada con esto de cortar con estas herramientas y eso que todavia no hice patchwork.


Sometimes when I cut fabric, the cuts close with all the lint or fibers in it.
I was worried about that so I had to google it up, turns out is kind of common and I found out many facts I didn't even know about, like, the mats love moisture or that they can be store under the mattress so they don't bend.
Here are some links:
· Care tips and other questions about cutting mats, Olfa cutting mats but I think it applies to almost every brand.
· An user review, very detailed and informative, I specially like when she says: "I make sure to run my hand over the cutting mat to brush any stray pieces of lint and fabric from the surface." That is my first instinct after I cut but I still see some fibers caught in there and that is starting to annoy me,
//Spanish break to translate, I've not seen much information about care and cleaning of cutting mats in my mother tongue so here comes my bit. Find the
¿Estoy usando esto bien?... me pregunto desde que compre mi plancha de corte (o llamada plancha de patchwork, base de corte o el nombre menos común, mesa de corte). Cada vez, o la mayoria de las veces cuando corto tela con el cortante circular en la plancha, quedan restos de tela en los cortes cuando se cierran, me preocupo eso asi que busque en internet.
No sale mucho en español pero si en inglés, asi que este es mi granito de arena para otros inexpertos como yo que recien se inician en usar esta "nueva tecnologia".
De este sitio donde hablan de los cuidados de las planchas Olfa pero que, yo creo, se pueden aplicar a todas las otras marcas, puedo resumir esto en cuanto a los cuidados:
- Es recomendable dejar en remojo la plancha de vez en cuando. Según ese sitio y otros que lei, la humedad es muy buena para las planchas. Para remojarla hay que ponerla en una bañera o batea o lugar donde quede plana y dejar en remojo por 15 o 20 minutos en una mezcla de 1/4 taza de vinagre blanco por cada 5 litros de agua fria o ambiente. Despues limpiar la plancha con jabon blanco y un cepillo suave para sacar los restos de tela de los cortes.
- No hay que doblar la plancha ni exponerla al sol ni al calor, ni hablar de apoyar algo caliente como una plancha... de planchar o la pava y el mate :p (solo para los entendidos de Sudamerica)
- Si la plancha de corte tiene olor, dejarla en remojo con una solucion de vinagre blanco y agua, enjuagarla y secar con una toalla. Repetir si es necesario.
- Y finalmente una buena manera de guardala es abajo del colchon o la cama o en algun lugar donde no se doble. Yo la guardo sobre la puerta del ropero siempre viendo que no se doble porque lei que cuando se dobla demasiado no hay vuelta atras.
No se si es porque no tengo experiencia o no se, o nadie habla de como sacarlos porque es demasiado común pero esto es lo que intente para sacar esos pedacitos de tela.✰
So on the weekend after I cut the pieces for the purple shrug, I saw a lot of jersey lint in the cuts, so I decided to test what I read.
I grabbed a glass of water and wet the surface, not a lot, just where the cuts where, then I massaged it a little bit and left it to absorb just a few minutes, then I grabbed an old teeth brush and started to brush the fibers, some came out but still there were a lot of it.
Then I dried the surface with a towel, and after a few minutes of staring at the mat and thinking: "I will never be able to make a patchwork blanket", something came to mind, I had read an article about cleaning a paper cutting mat and it said something about using tape, it was genius!, so I tried... and it totally worked!
✰Agarre un vaso de agua y moje la superficie donde estaban los cortes, masajee un poco y deje que absorba un par de minutos, después cepille los cortes con un cepillo de dientes viejo y salieron un poco de hilos, pero igual seguia quedando bastante. Seque la plancha con una toalla y despues de pensar un rato, me acorde que habia leido algo sobre usar cinta adhesiva para limpiar pedacitos de papel de una plancha de corte para papel tipo guillotina. Probe y funciono bastante bien!

Tal cual depilación tradicional :p, hay que cortar un pedacito de cinta, pegarlo, raspar para que los hilos se peguen bien y dar el tiron!

Salen bastante bien, use varias veces la cinta hasta que no se pegaron mas hilachas y asi repeti hasta que quedo como nueva... un alivio, ya me sentia frustada con esto de cortar con estas herramientas y eso que todavia no hice patchwork.

Thought I could share this just in case there is another worried noobie out there.
Monday, October 3
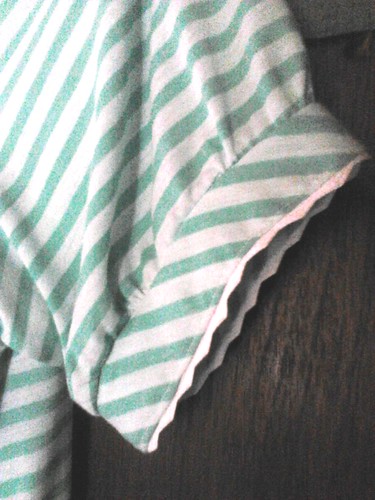
Jersey Long Shrug with pleats and puffy sleeves
I don't really like showing my arms or shoulders, they get really sunburned when I walk home from college after midday :( (I get the burn feeling just thinking about it) and I don't like the idea of "patchy uneven tanned" arms.. actually I don't like the idea of being tanned at all but oh well, I can't always hide from the sun.
So for this season I've decided to sew myself some shrugs, I made sort of a long one on the weekend but I think next ones will be more like sleeves, I'm not that crazy to melt just because of my shoulders.
Anyways, this pic at Pinterest was my main inspiration:

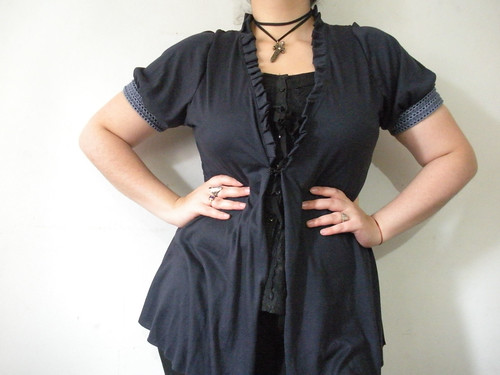
There were some tiny lil mistakes in the finishing but I really like how it turned out, I think I'm going to repeat this pattern again.
I made my own based on a long and fitted top (edit: something like this pin on how to make your own pattern) I like and then I made the sleeves based on the top and back pattern, my pattern making knowledge was useful here. I gotta say, I got lucky with the pattern for the pleated neck, the long strip I cut was just right, wide and then narrow, just perfect.
Thing about making pleats out of jersey fabric is that it needs to be ironed and pressed a lot, jersey is light and stretchy compared to the common fabrics used to make pleats. But they are holding still though, the neck doesn't most of the times but I don't mind.
Sunday, October 2

Sunday, September 25

Sunday, September 18
Friday, September 16

Subscribe to:
Posts (Atom)